Easy aquaponics is moving to http://cityaquaponics.blogspot.com/ we could not get the domain name we wanted so we had to change our blog's name.
- Grant
Tuesday, November 10, 2009
Tuesday, November 3, 2009
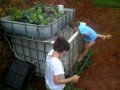
Step 6 - Plant your seedlings
Once you have assembled your system and you have added your water and growmedium, you are ready to start cycling your system. Basically this comes down to running your system without fish for about a week until your bacterial collony is established. I like to start by planting a few plants at this time as well.
Although you are able to start you plants from seed in an aquaponics system, I prefer to use seedings. This is where this start to get a bit wierd and seem to go against common sense. Nobody ever said this was going to be logical, just easy.
Get a bucket full of rain water or if you have good enough water(see step 5) then use tap water. Start by carefully removing your seedling from the tray. Wash the roots gently in the bucket of water to remove as much of the soil as possible without damaging the roots system too much(a little damage is inevitable).
Then dig a hole in your gravel(or grow medium of your choice). Place the seedling in the hole a gently cover the roots with your grow medium. This part just freaked me out the first time, I just could not get past the idea of planting plants in stones instead of soil.
Now that everything is set up you need to keep your plants alive until you have added the fish. I do this by adding liquid plant food called seagro. Be sure to use organi stuff only from now on or you could end up poisoning your fish or yourself. Check out this video clip to see how I do it. I also throw about a handful of fishfood into the system at this time. It will breakdown and begin to rot which will create amonia and this is just what your bacterial need to feed on so that they can establish themselves in your system.
You will want to keep testing the water over the next few days, when you start to see an increase in the level of nitrates in your system you know you are getting close to the time where you can add your fish.
- Grant
Saturday, October 31, 2009
Step 5 - Water and PH

So after many hours of research on the net I found out that water has something called a buffering effect, and no amount of PH down or other similar product will change it. You see there are always chemical disolved in the water which you cant see with the naked eye which cause this buffering effect. So everything you do to change it only works for a short time before your water returns to what it was.
These PH flucuations are far more damaging to your fish than a constant high or low PH(within reason). I farm with Tilapia and they can handle PH ranges anything from PH5 to PH11(some sources say even more) as long as it is constant and there are no sudden changes in PH. You can add fish to a system that has a big difference in PH to where they come from, but you have to do it VERY slowly.
That is why it is important to test the water from your supply before you add it to the system. If you find your water is very high or low in ph you could try filtering it through a reverse osmosis filter. We have one of these for our drinking water and although it is slow I was able to keep my fish alive with it. You will need a lot of water so this is not ideal. Larger scale models are available but I found that they are too expensive.
The answer for me turned out to be rain water. Check out this clip on my rain water collector. Aquaponics reqires a lot of water to star up, anything from 100liters to 5000liters depending on your requirements. I needed 300liters for my systems so the rain water was ideal.
Testing the water is crucial in any aquaponics system but for me the 1st test is by far the most important of all.
- Grant
Wednesday, October 28, 2009
Step 4 - Grow Medium
It is time to choose the stuff you are going to grow your plants in or your grow medium. In aquaponics like hydroponics you need a good grow medium which has the following characteristic:


- Is stable and does not break down over time.
- Is readily available in case it needs to be replaced.
- Provides good support for your plants.
- Does not leach anything into the water, this is important because you could poison your fish and yourself, or play havoc with you PH.
- Must be easy to work with.
- Is affordable, this was number one on my list but I figure not everybody has this requirement so I put it lower down.

I chose 13mm gravel or crushed stone and I have never been sorry except for the very first time I added it to my system. This stuff needs to be washed repeatedly to get all the dirt off it. If like me you are impatient to get going you will not wash enough and you will end up with sediment buildup in your system which could well damage your pump or worse kill your fish.
I have no idea what this sediment is or what affect it has on your system but I do know it sticks to everything like this photo shows.

The greyish stuff stuck to the PVC pipe is the sediment I am referring to. It sticks to just about anything, you can just imagine what it is going to do to your fishes gills.
Anyway Backyard Aquaponics has a great magazine which I can recommend to anybody. In Issue 3 (trial by media) they discuss the pros and cons of 4 different grow media. They also have great looking kits for sale if you find yourself in Australia for a day :)
- Grant
Monday, October 26, 2009
Sunday, October 25, 2009
Step 3 - Pumps and things
So now it is time to continue building our "easy" aquaponics system.

You will need a good quality pump. Find a submersible pump that has at least a 1meter head (head is the maximum height that your pump can push water). I prefer a pump that has a 2 meter or more head. I just feel that way the pump does not have to work so hard (that is just my personal preference).

The flow rate of your pump is also important because too little and your bell siphon may have trouble starting and too much and it can’t stop. You can use a 22mm PVC pipe in the centre of you bell siphon instead of the 25mm if you have a pump with a low flow rate. I started with a 22mm piece because you can easily go bigger but it is a real pain to go smaller once you have a 25mm hole in the grow bed. It turns out the 25mm is better suited to my pump size.
You will also need plastic piping to get the water from your pump to your grow bed. I got mine from the building supplies shop that sold me the pump. I attached a piece of 22mm PVC pipe to the outlet end. This helps me to move it, the PVC pipe is nice and hard and I can just jam it into the grow bed without digging out any of the gravel. Check out the video clip here.
- Grant
Friday, October 23, 2009
Disaster strikes again

Well last night my submersible pump failed, the scary part is that one of the divisions of our company sells online backups for your data. Here I was, 8pm in the evening, failed pump in hand and all the stores are closed. I don't even know anybody who could lend me a spare pump.
I can't tell you how thankful I am for the 50 bucks I spent on a small air pump and an air stone. That was the only thing keeping my fish alive. I had to fill the growbed by hand and leave if full for a few hours before draining it through the syphon on my way to bed.
So almost first thing this morning I was at the hardware store to purchase a new pump. I spent about 35 minute just reading the lables(a habit I got from my wife when she buys food - or just about anything) on each type of pump. Finally I came across a box that was help together by sellotape and was priced ar 80 bucks and when they rang it up at the till it was only 70 bucks. I told them it was cheeper than the shelf price and they said because it was the last one it was priced to sell.
It turns out that this water fountain(pump with fountain atachments) was missing the foytain parts but was basically brand new. I installed the pump and after a few minor adjustments it was up and running and all is well again. Anyway you can check out thevideo clips here.
- Grant
ps I did not forget about the diy guide. I will post the next steps soon, but you can bet I will be mentioning the backup pump in the equipment list
Wednesday, October 21, 2009
Brain wave
Check out www.sfgsa.co.za, this is Square foot gardening South Africa. A thought just hit me while I was looking at the planting guide. Why don't I apply the principles of square foot gardening in combination with aquaponics?
I am probably going to build a new system this weekend so that I can show you how to make a bell siphon to drain the grow bed. So when I plant this system I am going to do it the square foot gardening way. Let's see how it turns out.
- Grant
I am probably going to build a new system this weekend so that I can show you how to make a bell siphon to drain the grow bed. So when I plant this system I am going to do it the square foot gardening way. Let's see how it turns out.
- Grant
Tuesday, October 20, 2009
Mud pie mischief
- Grant
Step 2 - Video update
Hi everybody,
I have just found the videos I made when I did my own tank, I have uploaded them to YouTube and have created link on the steps listed in Step 2.
- Grant
I have just found the videos I made when I did my own tank, I have uploaded them to YouTube and have created link on the steps listed in Step 2.
- Grant
Monday, October 19, 2009
My chicken coop
Check out the chicken coop I build a few months ago. This was an afternoon project once I had the plans drawn out correctly and got the lumber and mesh.
- Grant
Step 2 - End product
 This is what your tank should look like once you have made all the cuts in the right places and reassembled the pieces. Note that this tank still needs to be washed out and I forgot to replace the black corner supports before I replaced the tank(I did it later after washing out the tank.
This gives me around 700 liters of possible fish pond and a 200 liter growbed. You are supposed to match tank water to growbed size by no less than 1 to 1, this setup is just over 3 to 1. Later I would find out why you need to size these correctly.
Anyway, on with the build.... Notice the white PVC pipe around the top edge of the fish pond, that is 50mm PVC which provides support for the growbed since I cut the steel frame in such a way that I was left with 4 steel pipes sticking up on each side. It also looks better and the angle grinder leaves a bit of a sharp edge on the steel which I wanted to protect myself and my kids from.
More and more I am learning that farming is not a quick Saturday afternoon job. With aquaponics you need patients because things just take time. Plants grow slowly and so do the bacteria you will need(which by the way you can buy commercially but there is a lot of evidence that it does not help at all).
- Grant
Sunday, October 18, 2009
Step 2 - update
So we were unable to prepare my friend's tank due to bad weather. I will update photos as soon as I can.
- Grant
- Grant
Friday, October 16, 2009
Step 2 - Preparing you IBC(my water tank) for fish
Follow these easy aquaponic steps :)
- Get a nice big screwdriver
- Unscrew these 4 screws
- Remove the plastic tank
- Get a small angle grinder
- Cut the steel frame here
- Replace the plastic tank
- Get a permanent marker
- Use the frame to mark the tank
- Remove the tank
- Join the dots and cut the tank
- Now carefully wash the entire tank inside
I am preparing a tank for a friend of mine this weekend. I will update this post with photos check back on Monday.
- Grant
Wednesday, October 14, 2009
Getting started - Step 1

use this IBC that we had hooked up to our gutter for rainwater
collection.
You can use anything you have handy as long as it will not leak or
poison the water. This tank was got from a freind and it was used to
store a food grade, water soluble substance( don't ask me what it was ).
- Grant
How easy is it?
When I started out researching aquaponics I got a lot of opinions from many different people telling me how hard or how simple it is to get started. Being an opinionated person myself, and given that it looked pretty easy, I started telling others just how simple it was.
My wife(the beautiful woman who has to live with my opinions 24/7) gently encouraged me to build one since I was quite obviously an expert on the matter.
Thus began the journey to prove that aquaponics is easy.
- Grant
PS
My latest advice to anybody dealing with opinionated aquaponocists(a new word is born) like myself is the following:
- Don't take any advice from them unless they have done it themselves.
- Double check anything they have told you.
- Don't argue with them you are wasting your breath.
Subscribe to:
Posts (Atom)


